Microsoft Word documents usually have a lot of data including Flowcharts, Images, Cliparts, and Text Data which often increases the document size. While the increased document size doesn’t make much difference when the file is stored on your HDD or PC, it makes a huge difference when you want to share the file with someone over mail or some other app. Mostly all the email services allow files up to 5MB and if your Word file has a bigger size then it creates a problem while sharing.
Hence, to solve these problems compressing the attached images in the document becomes important. As of now, this operation can only be done on a Windows PC or a Mac as Microsoft Word on mobile devices doesn’t support this feature yet.

How to compress images in Microsoft Word
Step 1: Open the Microsoft Word document in which you want to compress the images.
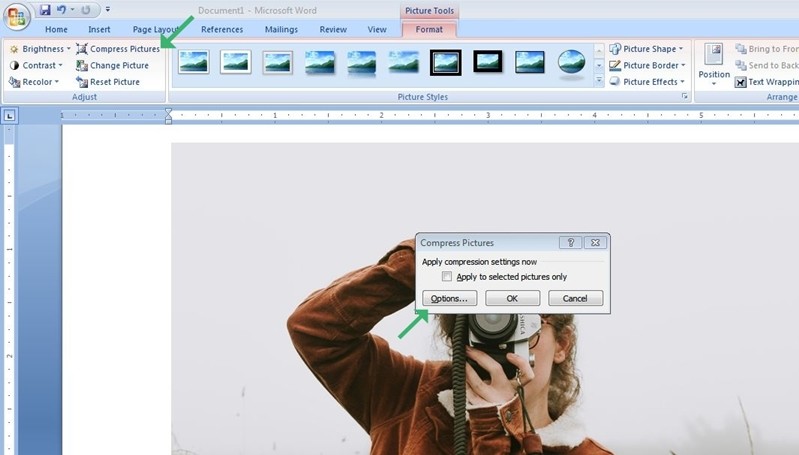
Step 2: Click on the picture that you want to compress and head to the “Format” section.
Step 3: Click on the “Compress Pictures” option and then click on “Options” to bring up the Advance Settings.
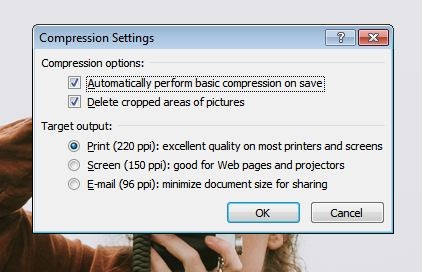
Step 4: From the available options, select your preferred output quality and click on “Ok” to apply your changes. That’s all doing this will compress your selected image. It is to be noted that compressing an image affects the image quality so if you want to print something make sure you don’t compress it much.
That’s all, folks! This same method can also be used on Mac devices to compress pictures in Microsoft Word. The newer version of Microsoft Word also comes with an HD (330 PPI) option that users can select if they want to make the images good enough to be viewed on High-Definition Displays. Were we helpful? Let us know in the comments below and if you liked this guide then don’t forget to share it using the social media buttons.
